Pages

Sunday, 2 July 2017

Small Gold Butterfly


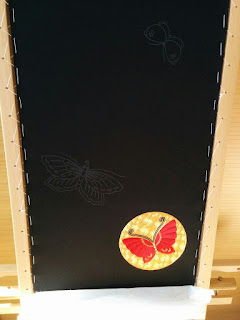
The main project I'm working on at the moment is my phase 4 Japanese Embroidery piece - the Butterfly Panel. After finishing the circles around the red butterfly, there was a bit more variety for the large and small gold butterflies. The small gold butterfly is now finished and the large gold butterfly is coming along as well.  


All I have left to do now, is to surround the large gold butterfly with circles. As it will be a larger area than around the red butterfly, it is still likely to take me a fair few months more. Here's how the whole design looks so far.


Saturday, 1 July 2017

Wave Handbag - avoiding second side syndrome


I am continuing to work on the Wave Handbag from the JEC as a background project. In my last post I had completed the lines for the flap and back piece. I decided to invest in another JE frame so that I can work on the smaller front piece at the same time. By working on both pieces simultaneously,  I can make sure I have enough beads for the front and flap of the bag to match. It also means I'll avoid procrastinating finishing off the second side.

Wednesday, 28 June 2017

Blue Dagger Kumihimo Necklace


I'm struggling to come up with a name for this necklace. The design is Pipalicious from Prumihimo but used daggers instead of pip beads. It is a short  necklace so it should sit as a collar. The daggers have a cool grid design and came from Stitch'n'Craft. This is a project that will bring back happy memories. It was my travel project on a trip to Japan earlier this year and pretty much all the braiding was done on the bullet train.

Tuesday, 27 June 2017

Wrap Bracelets


Wrap bracelets have been on my to do list for a couple of years. My first attempt wasn't successful because the semi-precious stone beads I used were too heavy for the leather cord. Last year when I spotted the Beads Direct Make It Break project was a wrap bracelet, I thought I'd have another go. The kit included tila beads, seed beads, waxed cotton cord and a Swarovski button for the clasp.

After watching a couple of videos which suggested holding the cord under tension, I pinned the cord to a block of  polystyrene foam, which I had covered in calico. This helped a lot and effectively gave me a third hand. As the bracelet got longer, I moved the start of the bracelet to the back of the block, so I was always working in a comfortable place at the front of the block.


There was enough supplies in the kit to make 2 bracelets, which meant I was able to make 1 for each of my girls. It was a relaxing project to do - I may try making another one in the future.


Sunday, 18 June 2017

Hearts for Manchester and London


I grew up in Manchester and my parents still live there. I also have 2 teenage girls so the situation is waiting in a theatre foyer to collect the girls after an event is a very familiar situation.  So it was with disbelief and great sadness that I read the news about the terror attack in my hometown. When I heard about the #AHeart4MCR project I was inspired to create this bead embroidered heart. The deadline for the Manchester heart drop was a bit sooner than I expected and I knew I wouldn't get it finished in time.


A new call for hearts was raised by #AHeart4LDN after the London terror attack, so I decided to change tack and make machine embroidered free standing lace hearts for the London drop. I used designs from Kinship Kreations, which stitched out beautifully on Brother machine. As recommended  I hooped 2 layers of water soluble stabiliser which made the result quite stiff. I thought this would make the hearts more robust so it was probably a good thing, as the hearts would be hung out on the street. I embellished them with hot fix crystals for a little bit of sparkle and posted them off.


The heart drop in London was yesterday and I was delighted to see a twitter post with a picture of one of my hearts. I have no idea who the recipient was but the fact that she was happy to receive it made my day. This success spurred me onto finish the bead embroidery on my own heart this weekend. Now I just need to work out how to mount it. My original intention was a simple stuffed heart but I think it would look better as a flat heart with a covered cardboard backing to give it a bit more support.

Sunday, 9 April 2017

Red Butterfly


It's been a bit of a marathon of going around in circles but the first butterfly for my Phase 4 Japanese Embroidery piece is finished. It's taken well over a year to get this far. I stalled a bit last year but a new year's resolution to get it going again has paid off. This is the first of 3 butterflies - the marathon will continue for some time to come.  I have a trip away coming up at the end of the week so I am very deliberately stepping away from this piece from a couple of weeks. Hopefully I won't have too much trouble getting going again when I get back.


Sunday, 2 April 2017

Making Waves


My current Japanese bead embroidery project is the JEC Wave Handbag.  The design comes in 2 parts. A larger piece which forms the bag back and flap, and a smaller piece which forms the bag front. Even though I am treating this as a background project, I've made reasonable progress over the last couple of months, finishing the outlines on the back and flap. The entire design will be blue iris triangle and seed beads. The original JEC bag had hex beads instead of the triangle beads, so I know my bag will look slightly different when it's finished. The triangle beads form a new clean line when they are couched down but I'm not sure how they will look when 2 lines are side by side. I am imagining choppy seas!

I've come to conclusion this is not going to be a very photogenic project. The blue iris beads look lovely close up but they come out very dark in a photograph. My camera phone automatically brightens the shot if I don't take the picture quick enough. If I take the picture too quickly the auto focus doesn't have time to work. I will probably need to ask Jen to take some pictures with her proper camera when she's home for Easter.


Saturday, 1 April 2017

Springtime Garden Necklace


I like the way beaded kumihimo ropes can be used as base for embellment. One way to achieve this is to use 2 hole beads, superduos  amd lentils in this case,. leaving 1 hole clear to add further beads once the rope is finished. The pattern for this necklace is Springtime Garden Necklace by Julia Hecht from the April '16 issue of Bead and Button magazine. I mostly kept to the same colour scheme but ended up changing the leaves to turquoise because I couldn't get hold of bronze leaves. The leaves are shiny on one side and matt on the other, so I was careful to keep them facing the same direction.

Recently I have been finishing my kumihimo necklaces with acrylic magnetic clasps. They have strong magnets and come in a variety of colours and sizes. Originally I found them in the US and then last year I discovered Robin's Beads in the UK was carrying a reasonable selection, so I made sure to stock up.

I ended up making this necklace twice. My first attempt was very twisted and wouldn't sit straight. It took me 6 months to persuade myself to undo it and have another go. On the second attempt I stopped the cords walking around the kumihimo disk by returning them to the start position after every move. There was still a slight twist but it was much better. When I wear it, the leaves lift up a little on my collar bones but I think that would always be the case and I'm probably the only one that notices it. I guess I must prominent collarboes


Saturday, 25 March 2017

Pipalicious Necklace


Last year Prumihimo launched the innovative Prumihimo braiding disk. It got some very good reviews, so I thought I'd give it a go. For my first trial project using the disk I followed the Pipalicious tutorial, which came free with the disk. I used knotting cord instead of the satin cord the tutorial recommended, which was probably a bit on thin side. I was pleased with the result though and it was good enough to give to Mum as a birthday pressie.

The Prumihimo disk produces a braid that doesn't twist as it's made, so accent beads sit nice and flat at the side of the braid. There are loads of options for beads to use instead of the Pip beads, so I don't think this will be the last necklace I make using the disk.

Friday, 24 March 2017

Clank Cake


While Jen was at home over Christmas. she made a late birthday cake for Graeme. The cake was 2 months late, so it seems a appropriate that I am 2 months late posting a picture of it on my blog. The theme of the cake was Clank, the robot character from the Ratchet and Clank PlayStation game. As well as a very cute Clank figure included a couple of crates and bolts which are a key feature of game.

Sunday, 29 January 2017

Sashiko Needlework Cases

At the Festival of Quilts a couple of years ago, I picked up a Lynette Anderson pattern for a set of covers for a needlework case. The back cover was pieced hexagons and it gave me the idea to do a sashiko design. It took me a year to decide exactly what I wanted to do, which was a diagonal line of flowers on the front and hexagons on the back. I wanted to do two cases, one as a present and one for myself. To make them different, I decided to have cherry blossom on one case and plum blossom on the other.

I wanted to experiment with transferring designs using my Silhouette Cameo, so I put created the front design using the Silhouette Studio software. The blossom designs came from Susan Briscoe's Ultimate Sashiko Source book. I used a Frixion pen in the Cameo pen holder and it worked very well.

The hexagon design for the back was created using a graphics package, which I imported in Silhouette Studio. That didn't work so well, because the Silhouette Studio software added some extra lines when it did the import. However, it was good enough and because I had used a Frixion pen, I knew I would be able to iron off the extra lines later.


I managed to transfer the design the weekend before we flew off to Tenerife on holiday, so it spent  some very enjoyable hours stitching on our hotel balcony listening to the soundtrack to Hamilton. This is one of those projects that will have strong memories of where it was stitched.


For the sashiko stitching I used some silk thread I had bought from Kimonomomo at the Houston Quilt Festival. It was beautiful thread to use but I used up most of a spool on each case.


I used a circular need to attach the covers to the cases. The black cases I had bought at the Festival of Quilts worked well for the plum design but didn't work at all for the cherry design. Fortunately I managed to find a cream case which suited the blue thread much better. That means I now have a spare case. I just need to decide what I want to do with it - maybe bead embroidery.


Saturday, 28 January 2017

Ski Chalet Cake


As it's still January, I think I can get away with sharing this year's ( or should I say last year's) Christmas cake. Jen was super busy at university up until the week before Christmas, so she didn't have a lot of time to plan the Christmas cake. As she's had such good results with the cake designs from Cakes and Sugarcraft magazine, I suggested she had a go at the Ski Season cake by Sherry Hostler in the December 2016 issue. As usual it was a great success. Jen modified the design a bit by putting a snowman next to the chalet rather than a fir tree. Over time he developed a bit of a lean, perhaps due a to a bit of apres ski!

Sunday, 1 January 2017

Honouring the Journey in 2017


I have decided that my mantra for 2017 will be "Honouring the Journey".  The idea for this mantra came from two sources. The most recent source was the film "Passengers", which we saw as a family on Christmas Eve. In the film Chris Pratt's character was given a piece of bartender wisdom that many people are so focused on their destination that they forget to enjoy getting there.

The other source was some management training I attended a couple of months ago, which covered the theory of growth mindsets developed by Carol Dweck of Stanford University. I won't try to explain it in detail because I'm in no way an expert. In principle, the theory says that intelligence can be developed and effort leads to success. One key aspect is that mistakes should celebrated and not feared because they are all part of the learning process. If you want to know more about growth mindsets there is a good video by Train Ugly here.

In the spirit of honouring the journey, here's a picture of the current progress on my latest piece of Japanese Embroidery. This is a JEC phase 4 design which focuses on goldwork.The red butterfly is the first of three. When it's finished the circle around the butterfly will be completely filled with gold circles and should look like hammered gold. It's very difficult to work on this under artificial light, so this piece is going to be a long journey.


Before I took the photo I turned the frame over so that I could tap the back to loosen any dust that had settled. We don't often look at the back of Japanese Embroidery, so it can be a complete surprise what the back looks like. It certainly was in this case. The path of the couching thread had created some interesting spiral patterns.


So in the year coming I will be doing my utmost to enjoy the journey and if not actually celebrating my mistakes, accepting them as part of the learning process. I would like to wish you all a creative 2017 and an enjoyable journey.